Cook It in Cast Iron
1/2/2021 | 24m 12sVideo has Closed Captions
Host Bridget Lancaster cooks a crispy Cast Iron Pan Pizza.
Host Bridget Lancaster cooks a crispy Cast Iron Pan Pizza, equipment expert Adam Ried shares tips on caring for cast iron, and test cook Keith Dresser makes Cast Iron Baked Ziti with Charred Tomatoes.
Problems with Closed Captions? Closed Captioning Feedback
Problems with Closed Captions? Closed Captioning Feedback
America's Test Kitchen is presented by your local public television station.
Distributed nationally by American Public Television
Cook It in Cast Iron
1/2/2021 | 24m 12sVideo has Closed Captions
Host Bridget Lancaster cooks a crispy Cast Iron Pan Pizza, equipment expert Adam Ried shares tips on caring for cast iron, and test cook Keith Dresser makes Cast Iron Baked Ziti with Charred Tomatoes.
Problems with Closed Captions? Closed Captioning Feedback
How to Watch America's Test Kitchen
America's Test Kitchen is available to stream on pbs.org and the free PBS App, available on iPhone, Apple TV, Android TV, Android smartphones, Amazon Fire TV, Amazon Fire Tablet, Roku, Samsung Smart TV, and Vizio.
Providing Support for PBS.org
Learn Moreabout PBS online sponsorship♪♪ ♪♪ ♪♪ ♪♪ ♪♪ -Welcome to "America's Test Kitchen" at home.
Today, it's all about cooking in cast iron.
First up, I'm making a pan pizza with an unbeatable crust.
Adam's gonna tell us how to take care of our cast-iron cookware.
And Keith's making a baked ziti with charred tomatoes.
We've got a great show today, so stick around.
♪♪ The year 1980 was a big year for me.
I'm not talking about the Winter Olympics being in New York or any kind of geopolitical event.
I'm talking about two huge inventions that came out that year.
One -- "PAC-MAN."
Big deal.
The other one was that Pizza Hut introduced and rolled out the pan pizza to all of their restaurants.
Now, "PAC-MAN" and Pizza Hut, for me, go hand in hand because I spent all of my babysitting money hanging out at that pizzeria, eating pizza out of a cast-iron dish.
And I'm gonna make that for you today, and it's so easy.
This might actually be the easiest pizza that you'll ever make.
So one thing that we want to do is create a dough that's nice and soft and plush inside.
Of course, after it bakes, it gets a nice crust on it.
But we're gonna start off with some bread flour.
So I'm gonna weigh out my bread flour here.
I need 11 ounces.
Dough is just basically flour and water, and it's the ratio that's really going to have an impact on the end result, so a good idea to weigh out your flour.
Next up, we got a teaspoon of salt and a teaspoon of instant yeast.
It's sometimes called rapid-rise yeast as well.
This is, again, a teaspoon.
Before I add my water, I'm just gonna give this a quick stir.
All right, so I'm done with the scale.
Now we're gonna add our water, and we're using 8 ounces of water here.
So this is a pretty well-hydrated dough.
When you start talking about something called baker's percentage, that's how we figure out how much water is in the dough in relation to the weight of the flour.
It's 11 ounces of flour and 8 ounces of water.
Now, this is pretty warm water.
It should register between 105 to 110 degrees, so that looks great.
It's really just kick-starting the fermentation process, get things bubbling quicker.
So I'm going to add this right in and stir it around with my wooden spoon here.
And you notice I don't have a mixer.
We don't actually need one since we're working with a high-hydration dough.
When the dough starts to come together, we're gonna just knead this right in the bowl, and I'm gonna use my hands and just knead it for about a minute until it really starts to come together.
And it should be a little bit sticky.
And that is all the kneading that we need to do to this dough.
I've got here a pie plate.
It's a 9-inch pie plate, and I have already sprayed it with a little bit of vegetable oil cooking spray.
I'm gonna plop this dough round right in there.
So just patting it out to about a 7-inch circle here in this pie plate.
This is not the dish that we're going to bake our pizza in, so don't worry.
Now I'm going to spray the top with a little bit of vegetable oil baking spray and cover the pan with some plastic wrap.
So at this point, this is going to go into the fridge, and we're gonna leave it in there for quite a bit of time -- anywhere between 12 to 24 hours.
While the dough is in the fridge, the yeast is going to feed on the carbohydrates and the sugars in the dough, and it's gonna start that fermentation process.
We're gonna have alcohols, flavorful esters, and other things that's going to make the dough taste really, really good.
And a high-hydration dough also helps to build structure.
With many pizza dough recipes, we're used to giving the dough a lengthy kneading process in order to build structure, but there is another way.
Let's first look at what happens when we knead dough in a mixer.
In order for gluten to form, the two proteins in wheat, glutenin and gliadin, must first mix with water.
The proteins become mobile, find each other, and bond together.
Mechanically mixing a dough for several minutes helps this process along.
However, our pizza dough is made with a high volume of water.
We mix it manually for a minute and then give the dough plenty of time to rest in the fridge.
Once in the refrigerator, the higher percentage of water in the dough allows the gluten proteins to move about on their own.
They find each other and link up into a protein mesh without much mixing.
The long stay in the fridge also allows for lots of complex flavor to develop, making this pizza not only super easy to make, but really easy to eat.
All right, let's take a look at our dough here.
Ah!
It had a good rest.
Again, it was 12 to 24 hours.
You can see it's risen a little bit.
Oh, this looks great.
And I actually let this sit on the counter for about 30 minutes, just so that it can warm up.
It's going to be easier to shape.
You can see it's nice and puffy.
So again, 12 to 24 hours in the fridge and then 30 minutes at room temperature.
So we're about ready to transfer it to our pan.
And we are using a cast-iron pan, of course, for our pan pizza.
It's going to develop a beautiful crust on that pizza like no other pan can.
I want to get it good and greased up because one of the hallmarks of a great pan pizza is that almost fried crust, so you got to load up the skillet with quite a bit of oil.
And I'm using 3 tablespoons of extra virgin olive oil here.
I'm gonna swirl this around just to make sure that it's coating the bottom of that pan.
All right, that looks well-coated.
There we go.
Gonna put a little bit of oil on my hands now because I'm gonna handle this dough.
I just want to transfer it into our cast-iron skillet.
So, oh, and now I'm gonna use my fingertips to continue to coax this out a little bit wider shape.
So I want to work this out to about an 1/8 of an inch from the edge of the pan.
And it's okay to press down on the dough a little bit.
You want to knock some of those bigger bubbles out at this point.
All right, so now I'll just put that piece of plastic right back on top, and we're gonna let this sit here at room temperature for a good hour and a half.
And we're gonna wait for that dough to get a little bit puffy.
In the meantime, we've got plenty of time to work on our sauce, and we're making a no-cook sauce here.
This is a 14-1/2-ounce can of whole tomatoes packed in juice.
Just gonna drain it, and since I want to get out a lot of the liquid so that we don't have to cook the sauce, I'm just gonna break these open with my hands to allow those juices to drain through.
There we go.
Now I'm just pressing on the solids here in the strainer to really get rid of some of that juice.
Looks like I'm gonna be making a mean Bloody Mary later.
All right, so that's looking pretty good.
Now I'm going to put these tomato solids into my food processor.
We have a few more ingredients we want to add.
First of all, I've got my friendly bag of frozen garlic cloves.
They come pre-peeled.
I love to store them in the freezer.
Let them thaw just for a moment, because then it's easy to grate them instead of mince them.
You can, of course, use a garlic press or mince them by hand.
I'm just using a rasp grater here.
There we go.
I'm going to add another teaspoon of extra virgin olive oil -- some nice flavor -- and 1/4 teaspoon of table salt.
I have 1/4 teaspoon of sugar, 1/4 teaspoon of dried oregano, and a pinch of red pepper flakes.
Just a little heat.
It's up to you -- big pinch, little pinch.
I'm going big pinch.
All right, lid goes on, and I'm gonna let this process until it's nice and smooth.
It's gonna take about 30 seconds.
And that is our easy no-cook sauce -- concentrated flavors.
And you can actually make this up to three days in advance.
Just store it in your fridge.
All we have to do is wait on the dough.
It's cheese time!
I've got mozzarella.
This is whole-milk mozzarella, gone ahead and shredded this.
It's about 7 ounces, or 1 3/4 cups.
We're using Monterey Jack as well.
This is 4 ounces of Monterey Jack, and you'll see why in just a moment.
But for now, all I need to do is shred this on the large holes of a box grater as well.
Put that aside.
Let's bring that pan with our crust, that beautiful dough, and you can see it's just started to get a little bit puffy.
We let it sit for an hour and a half, so it's just given it time to rise a little bit and wake back up.
First of all, I'm going to add 1/2 a cup of our no-cook sauce to our pizza.
Now I'm going to spread this until it's about 1/2 inch from the edge of the pizza.
Mmm, mmm, mmm.
So now we're gonna bring in our Monterey Jack cheese.
We're not topping the pizza with Monterey Jack cheese.
We're actually going to create a wall around the perimeter.
Sometimes when you order a pan pizza and a little bit of the cheese hits the side of the pan, it starts to fry and turn brown.
That's called frico, and we love it so much that we're creating it from the bottom up.
So I'm gonna go ahead and sprinkle this Monterey Jack around the perimeter.
And we're using Monterey Jack here because it is a drier cheese than mozzarella, and it's a little less salty.
Just making sure I have enough to go around.
It's okay if it touches a little bit of the sauce.
So that's looking good.
I've spread it all around the perimeter, and now I'm just gonna press it onto the edges of the pan to create kind of a 1/4-inch to a 1/2-inch-tall cheese wall.
Now, that is looking pretty good.
Now, obviously, as it bakes, some of this cheese is gonna slump down a little bit.
That's perfectly fine.
We want to get some good adherence to the pan.
That way it'll brown nicely.
And we can't forget about the middle, so we're gonna use our mozzarella here.
And this is 7 ounces of whole-milk mozzarella, and it just goes right over the sauce.
Oh!
Amazing.
So this is ready to bake, and I'm gonna put it in a 400-degree oven.
I'm gonna place it on the lowest oven rack, and that assures me that the bottom of this pan is close to the heat source, and we can start to get some good browning.
So we're gonna leave it in there for about 25, up to 30 minutes, until it looks really well browned.
♪♪ Ooh!
Now, that's a pizza.
Oh, look at that sizzling and the crust around the edge of the pan.
Beautiful, where the cheese started to melt.
So before I move on, I'm just gonna let this sit here for about three minutes until the sizzling stops.
I'm gonna keep a towel on the pan handle, just remind myself not to touch it.
All right, the bubbling stopped, and now I'm gonna take a butter knife and just run it around the edge of the pan.
That's why I wanted this pizza to sit for about three minutes.
It's gonna allow the cheese to loosen from the sides.
And also, I'm gonna take a peek underneath and see how the browning is doing.
Oh!
The edge is amazing.
So I'm gonna take a very thin spatula here and just take a peek underneath to see how the browning's doing there.
I can see a little bit of color there, but I want to get this a little bit more brown, so I'm going to put the burner on underneath the pan, turn it to medium, and I'm gonna let this go for up to five minutes.
I'll lift it up and check it every few minutes just to make sure that it's not over-browning.
Looks great, smells even better, and I just checked under the hood, so to speak, and the color looks beautiful.
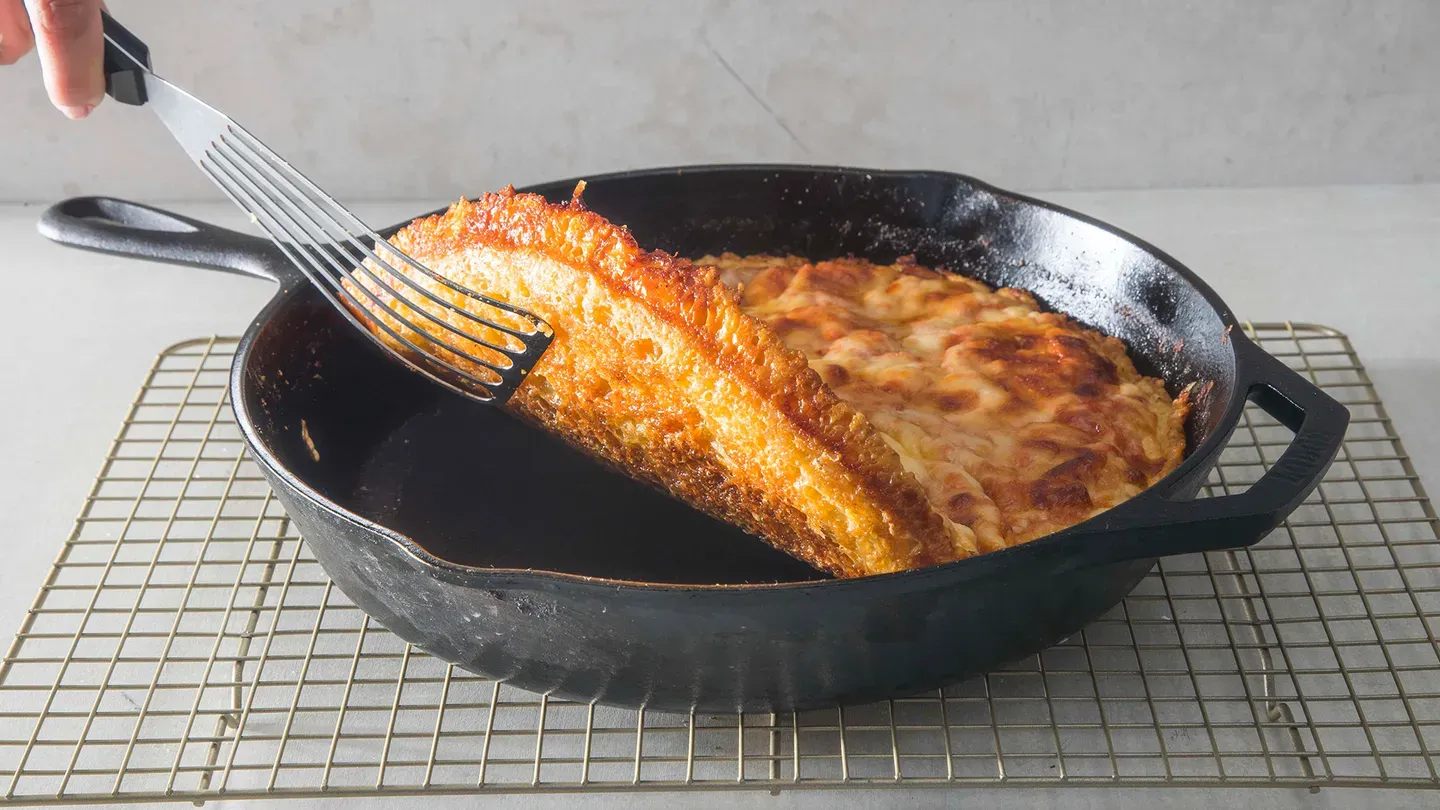
So I'm gonna take two thin spatulas, and that pizza comes right out and I'm gonna transfer it to a wire rack.
I'm gonna let this cool down for about 10 minutes before I eat it.
♪♪ That might have been the longest 10 minutes of my entire life, but the pizza's now safe to eat because it's cool enough.
I'm gonna slide it off of the rack here.
There we go.
And here's a trick that I learned from a friend that used to work at a pizzeria.
You start right in the middle, and then you go out.
That way, you're not crushing the crust.
Let's pull us apart and see what's going on on the inside.
Oh!
Doesn't that look amazing?
Oh, and it's super crisp, too.
All right, so I'm gonna do the same here, cut this right across from the center.
And I'm gonna stop cutting now because, well, I just want to start eating it.
Beautiful, fluffy interior.
Really beautiful crumb.
We'll see how it tastes, though.
Mmm.
Super cheesy.
I'm gonna go for the crust, and again, that's where that frico cheese is.
Mmm!
That is what this pizza is all about.
It's that super-cheesy crust that got nice and toasted.
I love it because we took the best of the '80s, and we left all that other junk behind.
So if you want to make this incredible pan pizza at home, remember these keys -- make a dough with a high percentage of water, build a wall of cheese around the perimeter, and finish the pizza right on the stovetop.
So from "America's Test Kitchen" at home, a plush and crisp, super-cheesy, and super-easy cast-iron pan pizza.
♪♪ Super cheesy.
♪♪ -The test kitchen teems with fans of cast iron, and why not?
It's a heat-retention pro, it's stick-resistant, it's inexpensive, and it's durable.
Cast iron always has to be seasoned, and a lot of times the factory takes care of that for you.
It's not hard to do yourself, though.
And for full information, you can go to our website.
Once you have cooked in your cast iron, then you have to clean it fairly carefully, and there are a few different steps.
While it's still warm, you want to wipe it out with paper towel to get rid of residual food and oil and then give it a rinse under warm running water.
If there's still gunk stuck in there, you have four different options.
The first is to use a non-metal scrub brush.
This is our favorite.
It's the Oxo Good Grips grill pan brush.
It's about $10.
Or you can use a non-abrasive scrubber.
This one is our favorite.
This is the Knapp Made small-ring CM Scrubber.
It's about $20.
If you have neither of those available, you still have two options.
You can make a paste out of kosher salt and a dab of warm oil.
The salt crystals can act as an abrasive and get the gunk off.
Or you can just use a little bit of dish detergent.
Whatever you use, you want to make sure that you rinse the pan really well under hot running water and dry it really carefully, but you're not done yet.
Put it over medium-low heat and evaporate any last traces of moisture, because you can't let it soak or drip dry like other kinds of cookware.
I go through one more little step when I clean my cast iron, and that is to maintain the seasoning by putting just 1/2 a teaspoon of neutral oil into the pan while it's warm and wiping it into the surface with a paper towel until it feels and looks slick.
I don't want it to feel oily.
And then I just let the pan cool down.
That's a great habit to get into to maintain the seasoning.
All right, now my favorite part of cast iron -- it does party tricks.
Some recipes and techniques have you use a flame tamer to maintain really low heat, say, if you're gonna keep mashed potatoes warm or cook in earthenware.
Your cast-iron skillet can act as a flame tamer.
You put your pan right on the skillet, and the skillet will moderate the direct heat of the burner.
Another trick -- if you are making panini but you don't have a panini press, put your two panini in the skillet, and then if you have a second cast-iron skillet, that goes right on top, and that serves as a panini press.
It weights them down perfectly, and you'll get a gorgeous crust.
The last trick that I love is this one.
A 10-inch cast-iron skillet can act as a pie plate if you need an extra one.
So those are all the reasons we love cast iron.
It is cheap, it's stick-resistant, and it's so durable you can will it to your grandkids.
♪♪ -Baked ziti can be a time-consuming recipe.
Between making the sauce, cooking the pasta, assembling the dish, and baking the dish, it can seem like a project.
But I have a streamlined version of baked ziti that tastes just as delicious and can be made in one pan.
In fact, I have the pan heating up on the stove right now, and it's a 12-inch cast-iron skillet.
Now, we're gonna be able to make the sauce, cook the pasta, and bake the final dish right in one pan.
Super easy.
But first, we're gonna start with our tomatoes.
I have 1 1/2 pounds of grape tomatoes here.
I'm gonna add 1 tablespoon of extra virgin olive oil and a teaspoon of salt.
I'm just gonna toss that really well.
Our tomatoes are ready, and now it's time to go on the skillet.
Okay, I'm gonna add this to our preheated skillet.
Now, it doesn't sound like much, but that skillet's really hot.
It's saturated with heat, and it's gonna start to char those tomatoes, which is gonna build a ton of flavor in our sauce.
And the idea is that we want to char these tomatoes pretty quickly, because as the juice is released from the tomatoes, it will inhibit browning.
So we want to get that pan nice and hot right at the beginning and char the tomatoes.
It will be delicious.
I'm just gonna let those char, stirring occasionally, for about 10 minutes until they start to break down and are nice and soft.
But while that happens, I'm gonna mince some garlic.
Okay, I have 6 cloves of garlic here, so a fair amount of garlic, but it's gonna add a nice flavor to this sauce.
Okay, that's our garlic.
Let's take a look at our tomato.
Now we have some action here.
Oh, that's great.
And you can start to see all this charring on the tomatoes.
So these are looking great.
I'm gonna let them go for a little bit longer, stirring occasionally, until they're all nicely charred.
It's been 10 minutes, and you can see that we have a lot of nice char on these tomatoes and they've started to break down.
Now we're gonna add a couple more ingredients to make this sauce really complete.
We have our garlic -- 6 cloves of garlic.
I'm also gonna add a teaspoon of tomato paste.
That's gonna give the sauce a little bit more tomato complexity.
And 1/4 teaspoon of red pepper flakes.
I'm just gonna stir this in and cook for about 30 seconds until we can smell that garlic.
Okay, that smells absolutely wonderful.
Now, I need to break these tomatoes down a little bit more to create a sauce, so I'm gonna shut the heat off, and I'm gonna grab a potato masher, or should I say a tomato masher.
And I'm just gonna mash these down a little bit.
Okay, that looks good.
Now, for our pasta, we're doing baked ziti, so we need ziti.
I have 12 ounces of pasta, add that right to the skillet, and 3 cups of water.
Just gonna stir this.
You scrape anything off the bottom of the skillet.
Now I'm gonna turn the heat to high and bring this up to a boil.
Okay, our water is at a boil.
Now I'm gonna turn this down.
I want to maintain a vigorous simmer to make sure that pasta cooks really nicely and evenly.
And I'm gonna stir this quite often.
I want to make sure that that pasta stays below the liquid.
I'm also gonna put a lid on this to make sure that we trap that steam.
Okay, we'll come back in about 15 minutes and check on our pasta.
♪♪ It's been about 10 minutes.
We should check on our pasta and give it a stir.
Yeah, we're getting close.
Now, you can see that it's starting to get dry, so we want to make sure that we're in here stirring often so it doesn't stick to the bottom of the pan, but it's looking really good.
We'll just let this finish up for a couple minutes, and then I'll prep a couple last ingredients for our dish.
First, we're gonna grate some mozzarella cheese.
I have 4 ounces here.
And what's baked ziti without basil -- fresh basil?
I'm gonna mince a lot of this, 1/4 cup of chopped basil leaves.
Basil's one of my favorite things to chop because it's so easy.
You just stack the leaves up, roll it into a nice cylinder, and then just cut across.
Turn that just 90 degrees and cut across it like that, just so I don't have really, really long, stringy pieces.
So that's it.
We're gonna wait for our pasta to finish up, and then we can finish this dish.
Okay, it's time to check the pasta to see if it's done.
It looks good.
Take one of these out.
It's great.
It's a little al dente right now, but it will be perfect once it's baked.
So I'm gonna shut this off so it doesn't cook anymore.
I'm gonna add a 1/2 cup of Parmesan cheese, stir this in, then I'm gonna add our 1/4 cup of basil.
And I want to season this.
When I checked earlier to see if the pasta was done, it definitely needed some salt and a good grind of black pepper.
This looks good enough to eat right now, but we want to add our mozzarella.
Okay, it's time to put the "bake" in our baked ziti.
I have my broiler preheated.
I'm gonna put that in there for about five minutes until the cheese is melted and brown.
Now, I don't want to walk away.
I want to keep an eye on this and make sure it doesn't burn.
Oh, it looks great.
Oh, it's perfect.
That cheese is melted, nice and brown.
This is looking absolutely fantastic.
So just five minutes under that broiler, the cheese is melted and browned and nice and gooey, but it's really hot right now.
So I'm gonna wait a couple minutes before I tuck into it.
I can't wait any longer.
I need to eat this.
Ah, look at that cheese stretch.
Beautiful.
Oh, yeah.
Ooh.
The first thing you notice is actually the texture of the sauce.
All that starch from the pasta has come out, but we've kept it, so it has a really, really creamy texture that clings to the pasta, just enough mozzarella to make it rich and creamy.
The Parmesan adds a nice nuttiness.
This is such a great recipe.
It's hard to believe that it's cooked in only one pan.
So if you want to try this recipe at home, remember two things -- use a cast-iron skillet and use fresh grape tomatoes.
So from "America's Test Kitchen" at home, a great recipe for cast-iron baked ziti with charred tomatoes.


Support for PBS provided by:
America's Test Kitchen is presented by your local public television station.
Distributed nationally by American Public Television