Summer Dinner for Two
1/2/2021 | 24m 12sVideo has Closed Captions
Host Julia Collin Davison makes Grilled Scallops with Fennel and Orange Salad for Two.
Host Julia Collin Davison makes Grilled Scallops with Fennel and Orange Salad for Two, ingredient expert Jack Bishop explains the differences between types of peppercorns, and host Bridget Lancaster prepares date night–worthy Freeform Summer Fruit Tartlets for Two.
Problems playing video? | Closed Captioning Feedback
Problems playing video? | Closed Captioning Feedback
America's Test Kitchen is presented by your local public television station.
Distributed nationally by American Public Television
Summer Dinner for Two
1/2/2021 | 24m 12sVideo has Closed Captions
Host Julia Collin Davison makes Grilled Scallops with Fennel and Orange Salad for Two, ingredient expert Jack Bishop explains the differences between types of peppercorns, and host Bridget Lancaster prepares date night–worthy Freeform Summer Fruit Tartlets for Two.
Problems playing video? | Closed Captioning Feedback
How to Watch America's Test Kitchen
America's Test Kitchen is available to stream on pbs.org and the free PBS App, available on iPhone, Apple TV, Android TV, Android smartphones, Amazon Fire TV, Amazon Fire Tablet, Roku, Samsung Smart TV, and Vizio.
Providing Support for PBS.org
Learn Moreabout PBS online sponsorship♪♪ ♪♪ ♪♪ ♪♪ ♪♪ -Welcome to "America's Test Kitchen" at home.
Today, we're focusing on recipes for two.
I'm making grilled scallops with a fennel orange salad.
Jack's dropping some pepper knowledge on us.
And, finally, Bridget's making summer fruit tartlets.
We've got a lot in store today, so stick around.
♪♪ ♪♪ -My husband, Ian, worked in the fish industry for many years, but we've never gotten tired of eating gorgeous scallops like this, which are rich and buttery.
And I love cooking them on the grill because it imparts a good flavor.
And I'm gonna serve these with a delicious fennel orange salad.
I'm gonna start by cutting up the orange.
Now, a lot of times I see [chuckles] people segment the orange when you're throwing it into a salad, 'cause you get rid of those membranes, which is a nice idea, but it's not my favorite way to cut an orange for salad, 'cause I feel like those segments, although pretty, are very delicate.
They fall apart, and they get everything covered with pulp.
So instead, I'm gonna lop off the top and the bottom of the orange, and then standing it on edge, I'm just gonna trim away, using a knife, the peel on the outside.
Now that the skin's all off, I'm gonna quarter the orange, cut out that center core and, along with it, any seeds that are hanging out in there.
And now I'm gonna slice it crosswise into pieces.
Alright, so that is the orange.
Now on to the fennel.
What I'm gonna do is I'm gonna trim the top of the funnel and the bottom of the funnel.
I'm gonna cut it in half, and I just want to cut out the core.
Now I'm just gonna slice it into nice, thin pieces.
You can take your time.
You can do it one layer at a time.
You can stack the layers.
Alright, into the bowl with the oranges this goes.
Now I'm gonna put just a little mint in here, and this is some beautiful, fresh mint, only about a tablespoon.
But I gotta say, any fresh herb tastes good in here.
I've used basil, I've used cilantro, scallions, tarragon.
The combination of fennel and orange really goes well with a lot, but fresh herbs are key.
Never use dry herbs for something like this.
Just gonna mince up this mint.
Mmm.
Perfect.
Add that to the bowl.
Now I'm gonna add just a little bit of olive oil, some salt and some pepper, and that's it.
That's how easy this salad is.
Alright, we're gonna set this aside.
On to the scallops.
So when you buy scallops, a few things to keep in mind.
You want to buy dry scallops.
That means they haven't been treated with any chemicals.
They're gonna have a fresh flavor, and they're gonna have a nice, dry, tacky texture.
So if you go to the store and you see scallops sitting in that pool of milky liquid, stay away.
Those scallops have been treated, and they'll have an artificial taste and a mushy texture.
Now, sometimes scallops come with this little side muscles attached.
You just want to pull that off 'cause it never softens during cooking, and it's always quite chewy.
Now, to season these scallops, make them taste a little special, I'm gonna add some pink peppercorns -- 2 teaspoons to the mortar and pestle.
They have a lovely, fragrant, slightly spicy flavor.
They're actually from the Peruvian pepper tree.
It's a dried fruit, and it's a member of the cashew family.
Alright, so I'm just gonna take this mortar and pestle, and I'm gonna crush these up lightly.
Don't want to make them too fine.
I like the big pieces 'cause I think they look pretty.
That's good.
Alright, I'm gonna set those peppercorns aside, and now we're gonna focus on the scallops.
Now, I'm gonna use skewers to help make them easier to maneuver around a hot grill.
And notice this is a double skewer.
If it's on a single skewer -- just one -- [chuckles] they tend to spin around.
The double skewer just keeps them securely in place.
I'm gonna do about four scallops per skewer.
I'm gonna space them out nicely on the skewers.
They all have plenty of room.
Now I'm gonna take them out to the grill on a little rimmed baking sheet.
I've lined it with foil.
That way I can use this baking sheet again to bring them back in, but it won't have the raw seafood on it.
And I'm gonna put just a little bit of oil on the scallops.
Going to season them up with a little pepper and some salt, and, of course, the pink peppercorns.
Alright, that's one side.
Let's get the second side, and then we can head out to the grill.
I've been heating this grill up for 15 minutes with all the burners on high, [chuckles] so it is rippin' hot, which is good if you're cooking seafood or scallops because it's less likely to stick.
Now, the other trick is to get a really clean grill.
So while it's hot, I'm gonna go in with a scrub brush and really get off any little bit of food that's been stuck on the grill grates from the last time I cooked.
Alright, so that grill is good and clean.
And now what I'm gonna do is I'm gonna rub the grill repeatedly with vegetable oil.
And how you do that is you have a long pair of tongs, a nice thick wad of paper towels, and a bowl of vegetable oil.
I'm gonna dip the paper towels in the vegetable oil and just run them over the hot grill grates.
What we're doing is we're not only cleaning the grill grates, but you're actually seasoning them so the scallops won't stick so much.
Now, when you're grilling something that's a little sturdier, like a steak, I just usually run the oiled rag over the grill grates once or twice.
But for fish, I'm gonna run it over these grill grates at least 10 times and really try to build up that nonstick coating.
I like to call this super-oiling the grill, and it's gonna catch on fire.
It always happens.
Personally, I think that's the fun part.
But don't worry, those flames will die down.
And you want to make sure they die down before you start cooking.
Gonna give it one last good coat of oil.
That should be pretty good.
Now, cooking the scallops is incredibly easy.
High heat, about three minutes a side, and that's all there is to it.
One skewer on.
Two skewers on.
Start the timer, and we're off.
[ Timer beeps ] So it's been about three minutes.
Time to flip them over.
Alright, three more minutes on the second side.
It's been about three minutes on the second side.
Oh!
You can see nice grill marks.
Time to pull them off the grill.
Again, not even a lick of sticking.
I love it when that happens.
Alright, just turn off the grill, let it cool down, and let's head inside.
Now that the scallops are off the grill, it's time to give them a taste.
First, put a little salad in the bottom of the bowl.
This salad is delicious with almost anything.
With the mint and the fennel, it's just fresh.
Now for the scallops.
Sometimes I think seared scallops have too much browning, too much flavor.
The grill just gives it a little bit of browning, but not overwhelming.
Now to dive in.
Oh!
Perfectly grilled scallops.
I especially like it when you have a little bit of the scallop with a little bit of the juicy orange.
Mmm!
Such a simple dish, but so elegant and has nice, fresh flavors.
If you want to make this lovely scallop dinner for two, remember two things.
First, only buy dry scallops.
And second, before you start cooking, make sure to super-oil that grill.
From "America's Test Kitchen" at home, a wonderful recipe for grilled scallops with a fennel orange salad.
♪♪ -Pepper is probably the most used and least understood spice in your kitchen, so let me tell you everything you're gonna need to know about pepper.
Let's talk about the black peppercorn, the thing we use most often in the kitchen.
So, the berries are picked when they're unripe, and then they're dried in the sun.
And the thing to know about black pepper is this has got the most piperine, the compound that makes pepper spicy.
It's not really the same as chilies, but it's the thing we perceive as spicy.
White starts with berries that are fully ripe, and then they are soaked in water and fermented.
And, basically, this processing washes away a lot of the piperine, and you can kind of taste the floral and citrusy notes that are there kind of in the background in the black pepper come to the foreground in the white pepper.
Obviously also a different color.
In some cases, you don't want those little black specks in your food.
Green pepper is also unripe berries, like the black.
But in this case, they're either flash frozen or they're blanched.
And so this sets their color so they remain green.
Again, I would say the flavor here is more like white pepper -- floral and citrusy.
So let's talk about the two things with the last name Peppercorn that actually come from different plants.
These are also dried parts of the plant, but it is a different variety.
The pink peppercorns here -- these are very mild.
They have a sort of fruity flavor.
Honestly, they probably have the least flavor of anything on the table.
Sichuan peppercorns -- they have the most flavor of anything here on the table.
They're musky.
They're a little lemony.
But most importantly, they cause this numbing, tingly sensation.
They have a compound, hydroxy-alpha sanshool, that actually causes this really unique chemical reaction in your mouth.
There's nothing like them on the planet.
They are definitely not a substitute for anything else here on the table.
So let's go back and talk about black pepper, the thing that you're most likely using.
And I know some of you are doing something really bad.
And I know this 'cause when I come to your house, I look in your pantry, and I see already-ground pepper that you bought that way in the supermarket.
Please don't do that.
I want you to buy whole peppercorns.
I don't care whether it's Tellicherry or Malabar.
Those are varieties indicating where the peppers are from and the size of the peppercorns.
It's just important that you buy whole peppercorns and that you grind them yourself.
Honestly, the pre-ground stuff that you sprinkle over your food -- it's basically sprinkling sawdust on your food, and you don't want to be doing that.
So there you have it.
Pepper -- it is the spice of life.
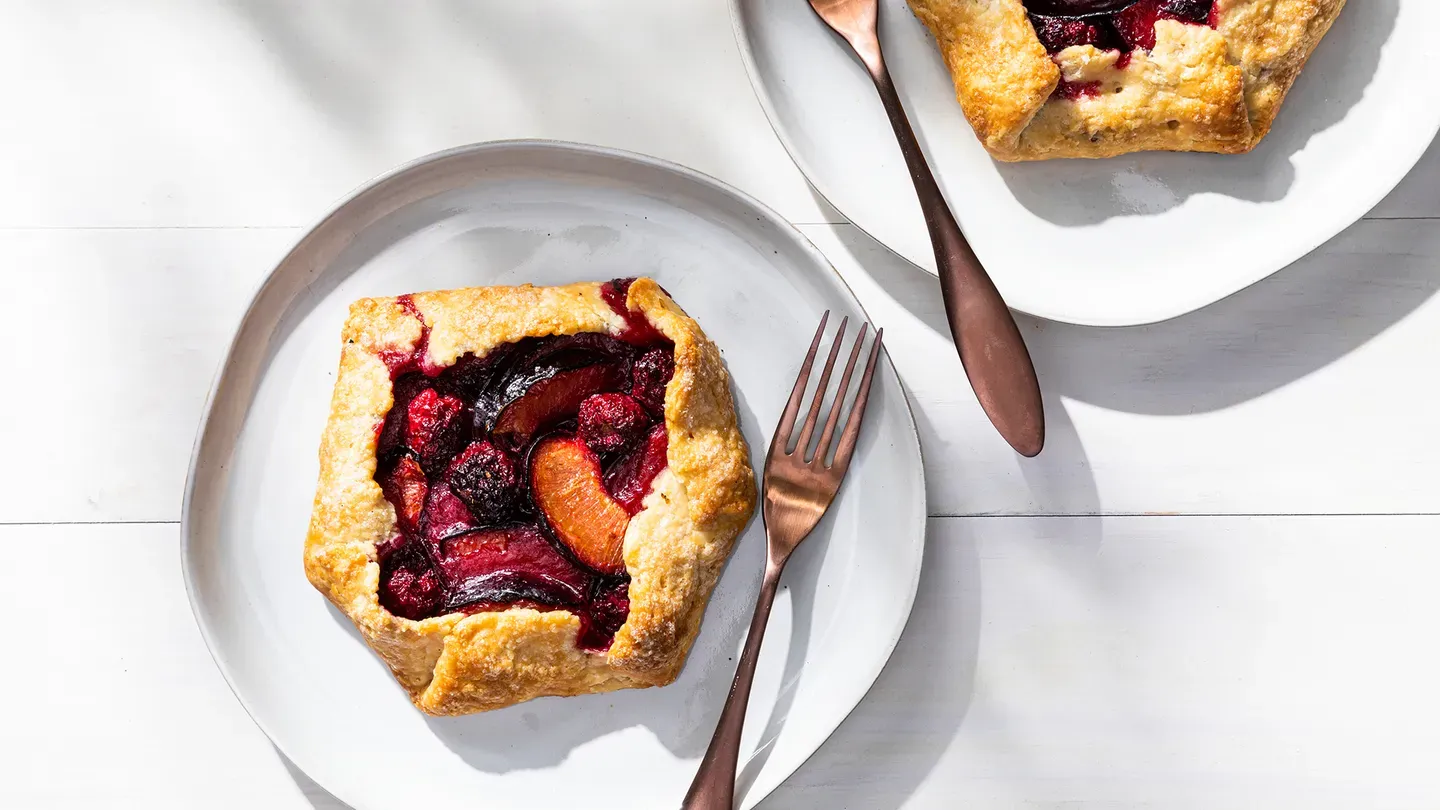
♪♪ -One of the best ways to enjoy all of that beautiful summer fruit is to make a freeform summer tartlet.
It's so easy to put together.
And the only thing that I can think of that's better than one big one is two small ones, because you get more of that outside crust, and it's made just for you.
Really easy to make.
And I'm gonna show you how to whip together the dough.
Now, we're using an all-butter dough here because, guess what?
We like butter.
It just tastes great.
But we're gonna use a little bit of a different technique to get some beautiful, flaky layers.
So I'm gonna start off by measuring my flour.
Always a good idea to weigh your flour instead of measuring it by volume because it's just that much more precise.
I'm looking for 3 3/4 ounces of all-purpose flour, so that's gonna be somewhere in between 3.7 and 3.8 on this scale.
There we go.
And now this is gonna go into a food processor.
We're gonna add a little bit of salt, 1/4 teaspoon of table salt.
It's just gonna dissolve nice and easy in there.
And then I'm gonna combine these two very quickly.
That's it.
Now I just need to get the butter.
Alright, this is 5 tablespoons of unsalted butter.
I've cut it into these small pieces about 1/2 inch in size.
That way they will incorporate into the flour more easily.
We want these really nice and cold, so I put them into the freezer to make sure that they're very, very chilled.
So I'll scatter these pieces over our flour mixture.
There we go.
Lid goes on.
And now I'm going to pulse this about 8 to 10 pulses.
We're gonna look for that butter to be incorporated in there with pieces no larger than a small pea.
Alright, always be mindful of where the blades are, but you can see that the butter is really worked into the flour at this point.
That looks great.
So now we can add our water, and we're using ice water here.
Again, we want this to stay really nice and cold so that the butter doesn't melt.
We're gonna start off with a tablespoon of ice water.
Just add that right in there.
I'm gonna give it a quick pulse.
So I'll probably add between 2 to 3 tablespoons of ice water in here, pulsing in between each time.
What we're looking for is the dough to start to come together.
Let's see if the third tablespoon does it.
So I can see the pieces starting to come together just a little bit.
Now, if I go in there and I pinch them together, you can see that they actually stick together in a big flake.
That is perfect.
So with many pie doughs, at this point, you would just bring it together into a disc and then wrap it in plastic and chill it.
But we're gonna do an extra step to ensure some beautiful, flaky, thin layers of butter.
I want to lightly flour my countertop here.
Alright, so that looks good.
And now I'll go ahead and dump this out onto my countertop.
And that just looks like a pile of crumbs at this point, but it really isn't.
So what I'm gonna do is kind of mush it together into a really rough rectangle here.
About 8 inches by 3 inches is what we're looking for.
And I'm gonna do something called fraisage.
Now, fraisage is a French technique, and it's where you smear the dough in increments so that it creates these beautiful, flaky layers.
And it's not a really big movement.
We're just gonna start at the end and start to smear and then work your way back.
Alright, so now I'm gonna move all this back together, flour the bench again, and, again, we're gonna do this one more time, about an 8x3-inch rectangle.
I just want to bring this together, because at this point, I want to divide it in half because we're making tartlets for two.
So I'll shape these into 3-inch discs and then wrap them nice and tight in plastic.
These are ready for the fridge.
I'm going to let them sit in there.
You want to give them a good hour in the fridge so that the flour can hydrate fully, but these can stay in the fridge for up to two days, or you can put them in the freezer and let them go for two months.
I'm gonna opt for the fridge.
We have some well-chilled dough here.
So it spent an hour in the fridge, and now it's time to roll these out.
Gonna grab some of my bench flour, but I'm not going to roll this out right on the counter.
Instead, I'm gonna roll this out between two sheets of parchment.
Now, I've cut half sheets of parchment in half again, just because I like to do that with these little tartlets.
Just gonna flour the parchment here.
Dough half goes on, flour the top, and another sheet right on top.
So we're gonna roll this out to about 7 inches round.
And at first I'm just going to rock the rolling pen back and forth a little bit to get this started into a round.
Now, you can also roll this out on the countertop if you want, but this dough is a little bit moist, so it might stick, and you might have the tendency to add a little bit too much flour.
As I've worked it, I'm just rotating the disc.
And you can see I can really get this rolled out without adding too much flour.
I'm gonna give you a little peek and see what's going on there.
Hey?
That doesn't look very round.
I'm gonna work on that side.
And it's okay if the edges aren't perfect.
If your edges really aren't perfect, you just call it a rustic freeform tartlet.
That looks spot-on.
There we go.
So now I'm gonna keep this between sheets of parchment and put it on a rimmed baking sheet.
And then we'll do the second round, just like the first one out to a 7-inch circle.
I'm gonna put it right on top of the first one I rolled out and put this back in the fridge.
You want to let it sit in there for at least 15 and up to 30 minutes.
It's time for the fun part.
We get to fill these tartlets with fresh summer fruit.
Now, I took the shells out of the fridge.
You keep them in the fridge for more than an hour, they're gonna be a little too hard to fold.
So I'm letting them sit here at room temperature just for a few minutes while I work on the fruit.
We're using a combination of stone fruit and fresh berries.
Now, you can use apricots, peaches, plums.
I'm using nectarines today, and these are beautiful.
You can actually smell them.
They have a little bit of a fragrance.
And if I just press them, they press just gently.
I can make a little bit of an indent.
But you don't want to use too-ripe nectarines, otherwise you're gonna end up with nectarine applesauce.
It's just not good.
So I need 8 ounces of fresh nectarines, so that's probably a little less than two.
There's a couple different ways that you can pit a nectarine.
I'm going to go around from the equator, and this is going to make it a lot easier for me to get the pit out.
So already it's easier to hold, and it just comes off like that.
Now, to get this little clingstone out, all I have to do now is cut this way.
And they just pop right up.
So easy.
So now I'm gonna cut these about 1/2 inch thick.
I'm gonna use a paring knife since I've got relatively small wedge here.
Alright, that's easy.
Into the bowl these go.
I mentioned fresh berries.
We're using blackberries here.
This is about 2 1/2 ounces, or 1/2 a cup.
And these are blackberries, obviously, but you can use blueberries or raspberries.
We're gonna add these in here, and it's really nice because you have the sweetness from the nectarine, the tartness from the blackberries.
Perfect combination.
Because a little bit of sugar goes a long way, I'm gonna start off with 2 tablespoons, and toss these again.
It's okay if the sugar doesn't fully dissolve.
No problem.
I'm gonna taste one of these.
These are really spot-on in terms of sweetness.
If they had been a bit more tart, I might have added another tablespoon of sugar, but don't need to.
That's all we need to do with the fruit.
Let me move this off to the side and bring up my two little discs.
I'll get rid of these papers.
Alright.
So now you want to mound the fruit in the center, and leave about an inch and a half of a perimeter around the sides.
And when I say mound, it's really -- it's better to place them on there, I think.
You don't have to be too precious about it.
Alright, that's looking pretty good, but I better save a little bit of room for those blackberries.
So let's add those in, too.
Oh!
I love it when they fall into the little nooks.
So now I'm gonna bring the sides up into the tart itself.
Now, as I do that, I want about an inch of space between the edge of the fruit and where this comes over.
So I'm only going to have to fold this over by about an inch.
And then as I go around, I'm just pleating the dough where I need to.
And I'm gonna press these.
I'm gonna go around and pleat, and then I'll go back and press them all, just to make sure that the dough stays up.
So the pleats are about every inch, maybe two inches.
Really, there are no rules at this point.
It's Thunderdome.
Alright, so I'm gonna go back and just pinch the pleats together so that they stick, but I don't want to pinch them and press them onto the fruit.
These are looking mighty fine.
Gorgeous.
So now all I want to do is add a little bit more shine and a little bit of enhancement to the crust so it'll be super crisp.
So I've got some water here.
Just brush the outer edge.
And now I'm gonna add another tablespoon of sugar and just start sprinkling it all over.
Just the edge, really.
If some gets on the fruit, I'm not gonna tell.
So these look absolutely gorgeous.
Now I'm gonna pop these into a 400-degree oven, and we'll let them bake in there for about 40 to 45 minutes.
I'll rotate the pan halfway through baking.
But as these bake, the fruit is gonna slump and kind of give up their ghost, and the juices are gonna come out.
May be a little bit of spillage on the pan, but that's totally fine.
♪♪ Ohhh!
Beauties.
Look at those!
Ah!
All bubbling and juicy and really hot, so obviously I'm not gonna eat it right now.
We're gonna let these firm up a little bit, stay on the sheet pan for about 10 minutes, and then I'll slide them onto a rack, release them from their parchment.
I'll let them cool down for another 20 minutes just so those juices thicken up a bit.
We are so close to the end.
All we really need to do is gild the lily with a little bit of whipped cream.
You could also use ice cream.
Whatever floats your boat.
So I've got a chilled bowl here -- just took it out of the fridge -- and a chilled whisk.
Now, the chilled bowl and the chilled whisk are great because the colder that the cream is and the bowl is and the whisk is, it's going whip up a little faster and a little easier.
So we're gonna add about 1/3 cup of heavy cream.
Don't really need to measure it.
Make as much cream as you want.
About a teaspoon of sugar and 1/4 teaspoon of vanilla extract.
I'm just gonna move my whisk back and forth.
And you can see when the whisk starts leaving a trail behind, it's getting close to soft peaks at that point.
Alright, so that looks great.
We're not looking for stiff peaks here, so nice, soft cream.
Let's plate.
A beautiful little tartlet for me and a nice, beautiful dollop of soft whipped cream.
That looks great.
Maybe a little bit more.
That looks pretty enough to eat.
Don't mind if I do.
The juices in there have thickened up a little bit.
Again, I let it cool for another 20 minutes after I took it off the parchment.
And really, you can let these cool even longer.
Great to make ahead.
So I'm gonna put a little bit of cream right on top there.
There we go.
A petite little wedge there.
That's a mouthful.
Mmm!
Amazing.
Sweet nectarines.
You get a little bit of that tartness from the blackberry, but the whole thing is not overly sweet, and the pastry is so, so flaky.
It's really tender, incredibly buttery.
That's about as good as summer gets.
And the best part is, this is for two, so after you finish this one, you get to eat the other one.
Now, if you want to make this at home, remember these three keys.
Fraisage the dough.
Sugar the fruit right before baking.
And pleat the dough loosely.
So from "America's Test Kitchen" at home, freeform summer fruit tartlets for two.
This one's for me.
That one's for you.


Support for PBS provided by:
America's Test Kitchen is presented by your local public television station.
Distributed nationally by American Public Television